多目标跟踪中的相机运动模型

前言

之前的博客中我介绍了Kalman滤波器,这个算法被广泛用于多目标跟踪任务中的行人运动模型。然而实际场景中存在有很多相机运动,仅仅依赖行人运动模型是不够的。这次我主要介绍下相机运动模型,以对极几何和ECC为主。完整的代码和示例我都放在了github

1 多目标跟踪中的相机运动

在多目标跟踪场景中往往存在有复杂的运动模式,这些模式除了行人这类非刚性运动,还有相机这类刚性运动。以MOT Challenge数据集为例,其中就存在大量相机运动场景,甚至超过了静态相机场景数。比如MOT17-13号视频中车载相机在车辆转弯时对于两个运动速度较慢行人的视角:

image-20200327161756167

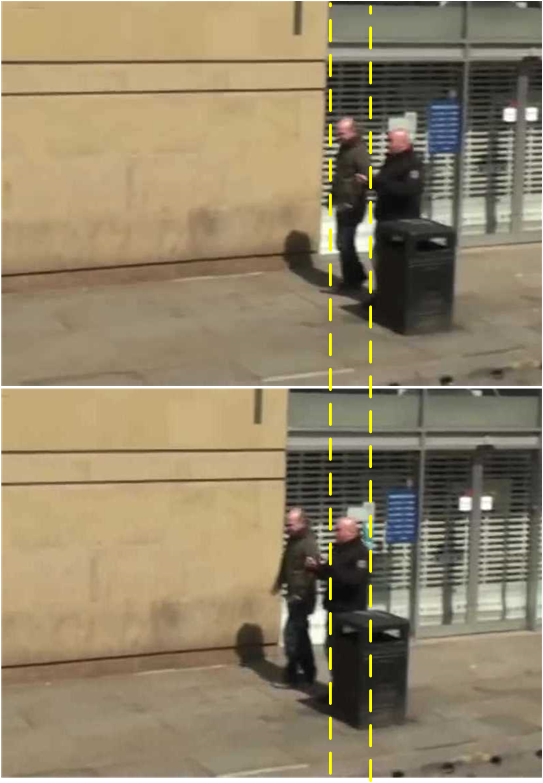
我们从示意图可以看到,由于车辆转弯速度很快,上一帧的行人位置映射到下一帧就变成了另一个的位置。因此相机运动对于多目标跟踪的影响很大,尤其是仅依赖运动信息的模型,相机的运动会严重干扰运动模型。

2对极几何

2.1 对极几何模型

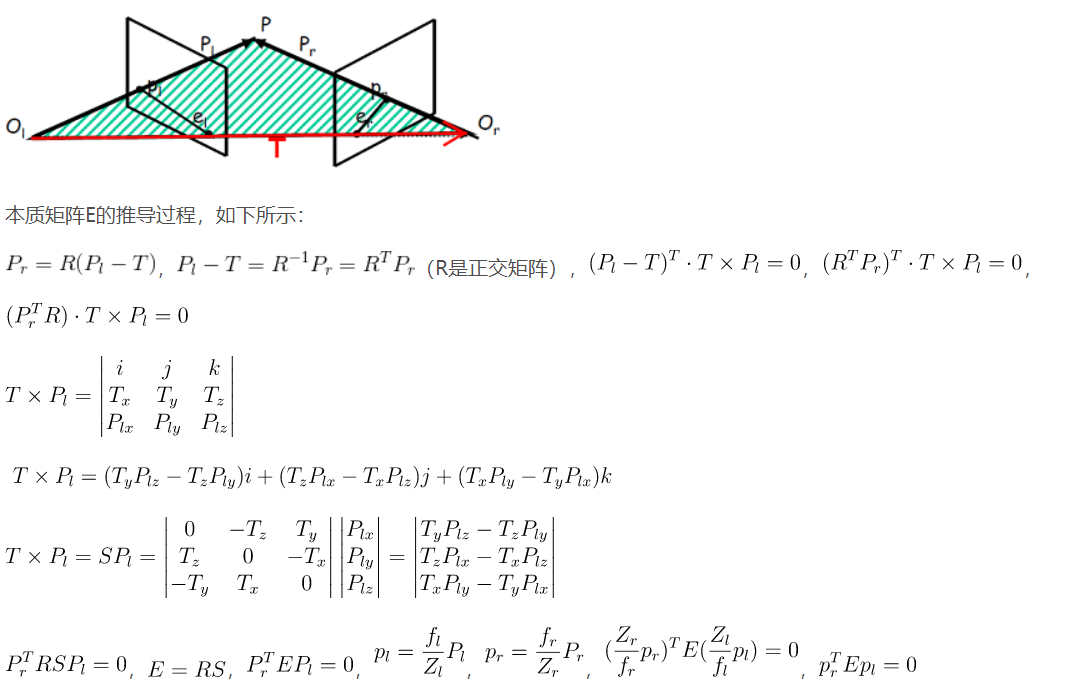
关于相机运动方面的知识,我在之前介绍单目深度估计中的无监督模型时介绍过,即将变化差异不剧烈的两帧画面近似看作不同相机视角下同一场景的画面,也就是对极几何,这一点可以看看《计算机视觉中的多视几何》中关于相机几何方面的知识:

img

不过这里我需要先解释一下一些概念,以方便后续模型的讲解:

  1. 基线[baseline]:直线CC’为基线。
  2. 对极平面束[epipolar pencil]:以基线为轴的平面束。
  3. 对极平面[epipolar plane]:任何包含基线的平面都称为对极平面。
  4. 对极点[epipole]:摄像机的基线与每幅图像的交点。比如,上图中的点x和x’。
  5. 对极线[epipolar line]:对极平面与图像的交线。
  6. 5点共面:点x,x’,摄像机中心C、C’,空间点X是5点共面的。
  7. 极线约束:两极线上点的对应关系。

接下来,我们首先看一篇ACM MM2019的论文TNT[1],这是一篇研究端到端运动信息和表观信息结合框架的论文:

image-20200327173044302

不过这里我们要讲的是其提出来的相机运动模型:

image-20200327173339469

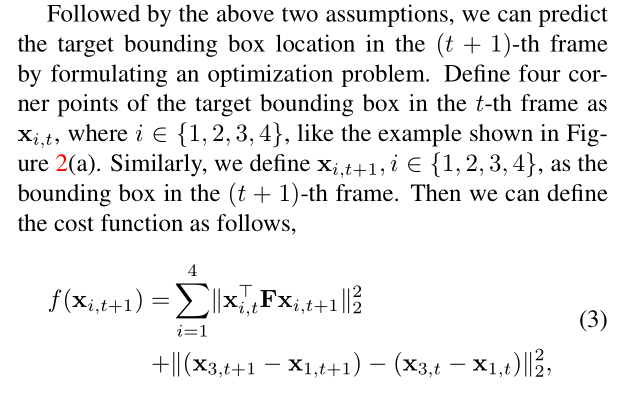
我们可以看到,作者将行人运动和相机运动结合了,其中目标函数的第一部分是利用了对极几何中本质矩阵F的性质,相关的理论推导可以看下图:

image-20200327173257802

其中x表示的目标框的四个顶点的坐标信息,第二部分中作者则是假设两帧中的同一目标的形状近似不变。因此我们只需要求得本质矩阵F,即可根据上一帧目标框信息,利用最小二乘法求得下一帧目标框信息。关于本质矩阵F的求解,作者提到基于SURF特征点提取和Ransac采样进行估计。

image-20200327174308906

不过作者也没有给出详细的实现过程,我这里试着做一下理论推导。首先由于作者在目标函数中要求了目标框形状的一致性,那么我们不妨直接把下一帧目标框的形状信息看做已知的。其次,我们先假设本质矩阵F已经被估计出来了,这个矩阵是3x3的形状,那么为了推导方便,我这里做一个假设:

对于第t帧的任意一个目标框的每一个节点$x$,这里由于是三维的几何信息,所以添加一个z轴坐标,令$x^TF$为一个已知的三维向量,那么一个目标框就存在四个这样的三维向量,不妨看作一个4x3的矩阵M

那么就可以将目标函数展开,这里面的(w,h)为已知信息,(x,y)为下一帧目标框的左上角坐标:

$$ \begin{array}{l} \left\{ \begin{array}{l} {M_{11}}x + {M_{12}}y + {M_{13}} = 0\\ {M_{21}}\left( {x + w} \right) + {M_{22}}y + {M_{23}} = 0\\ {M_{31}}x + {M_{32}}\left( {y + h} \right) + {M_{33}} = 0\\ {M_{41}}\left( {x + w} \right) + {M_{42}}\left( {y + h} \right) + {M_{43}} = 0 \end{array} \right.\\ \Rightarrow \left[ {\begin{array}{*{20}{c}} {{M_{11}}}&{{M_{12}}}\\ {{M_{21}}}&{{M_{22}}}\\ {{M_{31}}}&{{M_{32}}}\\ {{M_{41}}}&{{M_{42}}} \end{array}} \right]\left[ {\begin{array}{*{20}{c}} x\\ y \end{array}} \right] = \left[ {\begin{array}{*{20}{c}} {{M_{13}}}\\ {{M_{23}}{\rm{ + }}w{M_{21}}}\\ {{M_{33}}{\rm{ + }}h{M_{32}}}\\ {{M_{43}}{\rm{ + }}w{M_{41}} + h{M_{42}}} \end{array}} \right] \end{array} $$
很明显这就是一个典型的Ax=b问题,后面的问题就迎刃而解了。

2.2 实验分析

为了保证效率,我这里采用ORB特征提取策略,然后采用brute force的匹配策略:

1
2
3
4
5
6
7
8
9
10
11
12
13
14
15
16
17
18
19
20
21
22
23
24
25
26
27
28
29
30
31
32
33
34
35
36
37
38
39
40
41
42
43
44
45
46
47
48
49
50
51
52
53
54
55
56
57
class Epipolar(object):
def __init__(self, feature_method = 'orb', match_method = 'brute force',
metric = cv2.NORM_HAMMING, n_points = 50, nfeatures = 500,
scaleFactor = 1.2, nlevels = 8):
"""Using Epipolar Geometry to Estimate Camara Motion

Parameters
----------
feature_method : str
the method of feature extraction, the default is ORB, more methods will be added in the future
match_method : str
the method of feature matching, the default is brute force, more methods will be added in the future
metric: metrics in cv2
distance metric for feature matching
n_points: int
numbers of matched points to be considered
nfeatures: int
numbers of features to be extract
scaleFactor: float
scale factor for orb
nlevels: float
levels for orb
"""
self.metric = metric
if feature_method == 'orb':
self.feature_extractor = cv2.ORB_create(nfeatures = nfeatures,
scaleFactor = scaleFactor, nlevels = nlevels)
if match_method == 'brute force':
self.matcher = cv2.BFMatcher(metric, crossCheck=True)

self.n_points = n_points


def FeatureExtract(self, img):
"""Detect and Compute the input image's keypoints and descriptors

Parameters
----------
img : ndarray of opencv
An HxW(x3) matrix of img

Returns
-------
keypoints : List of cv2.KeyPoint
using keypoint.pt can see (x,y)
descriptors: List of descriptors[keypoints, features]
keypoints: keypoints which a descriptor cannot be computed are removed
features: An Nx32 ndarray of unit8 when using "orb" method
"""
if img.ndim == 3:
img = cv2.cvtColor(img, cv2.COLOR_BGR2GRAY)

# find the keypoints with ORB
keypoints = self.feature_extractor.detect(img, None)
# compute the descriptors with ORB
keypoints, descriptors = self.feature_extractor.compute(img, keypoints)
return keypoints, descriptors

那么对于本质矩阵的估计和最小二乘法的应用,都可以直接利用已有的工具箱opencv和numpy搞定:

1
2
3
4
5
6
7
8
9
10
11
12
13
14
15
16
17
18
19
20
21
22
23
24
25
26
27
28
29
30
31
32
33
34
35
36
37
38
39
40
41
42
43
44
45
46
47
48
49
50
51
52
53
54
55
56
57
58
59
60
61
62
63
64
65
66
67
68
69
70
71
72
73
74
75
76
77
78
79
80
81
82
83
84
85
86
87
88
89
90
91
92
93
94
95
96
97
98
99
100
101
102
103
104
105
106
107
108
def GetFundamentalMat(self, keypoints1, descriptors1, keypoints2, descriptors2):
"""Estimate FunfamentalMatrix using BF matcher and ransac
[p2;1]^T K^(-T) E K^(-1) [p1;1] = 0, T means transpose, K means the intrinsic matrix of camera
F = K^(-T) E K^(-1)

Parameters
----------
keypoints : List of cv2.KeyPoint
using keypoint.pt can see (x,y)
descriptor : ndarray
An Nx32 matrix of descriptors

Returns
-------
F: ndarray
A 3x3 Matrix of Fundamental Matrix
mask: ndarray
A Nx1 Matrix of those inline points
pts1: List of cv2.KeyPoint
keypoints matched
pts2: List of cv2.KeyPoint
keypoints matched
matches : List of matches
distance - distance of two points,
queryIdx - query image's descriptor id, default is the second image
trainIdx - train image's descriptor id, default is the second image
imageIdx - train image's id, default is 0
"""
# matching points
matches = self.matcher.match(descriptors1, descriptors2)
matches = sorted(matches, key=lambda x: x.distance)

pts1 = []
pts2 = []
for i, match in enumerate(matches):
if i >= self.n_points:
break
pts1.append(keypoints1[match.queryIdx].pt)
pts2.append(keypoints2[match.trainIdx].pt)

pts1 = np.int32(pts1)
pts2 = np.int32(pts2)
matches = matches[:self.n_points]

## Estimate Fundamental Matrix by ransac, distance_threshold = 1, confidence_threshold = 0.99
F, mask = cv2.findFundamentalMat(pts1, pts2, cv2.FM_RANSAC, 1, 0.99)

return F, mask, pts1, pts2, matches


def EstimateBox(self, boxes, F):
"""Estimate box in target image by Fundamental Matrix

Parameters
----------
boxes : array like
A Nx4 matrix of boxes in source images (x,y,w,h)
F : ndarray
A 3x3 Fundamental Matrix

Returns
-------
aligned_boxes: ndarray
A Nx4 matrix of boxes in source images (x,y,w,h)

Method
-------
L = ||Bi^T F Ai||2 + ||(A2-A0)+(B2-B0)||2
A is the four corner of box in source image
B is the four corner of aligned box in target image
A0,B0:top left corner of box, [x;y;1]
A1,B1:top right corner of box
A2,B2:bottom left corner of box
A3,B3:bottom right corner of box
the height and width of boxes and aligned boxes are assumed to be same
we can use greedy strategy: make M = A^T F^T
then:
M11 x1 + M12 y1 + M13 = 0
M21 (x1+w) + M22 y1 + M23 = 0
M31 x1 + M32 y1+h + M33 = 0
M41 (x1+w) + M42 (y1+h) + M43 = 0
=>
M[:2][x;y] + M[:3]+[0;M21w;M32h;M41w+M42h] = 0 ->Ax = b
x = (pseudo inverse of A )b

"""
boxes = np.asarray(boxes)
if boxes.ndim == 1:
boxes = boxes[np.newaxis, :]
aligned_boxes = np.zeros(boxes.shape)

for i, bbox in enumerate(boxes):
w = bbox[2]
h = bbox[3]
AT = np.array([[bbox[0] , bbox[1] , 1],
[bbox[0] + w, bbox[1] , 1],
[bbox[0] , bbox[1] + h, 1],
[bbox[0] + w, bbox[1] + h, 1]])
M = AT @ F.T
b = -M[:, 2] - np.array([0, M[1][0]*w, M[2][1]*h, M[3][0]*w+M[3][1]*h])
aligned_tl = np.linalg.pinv(M[:,:2]) @ b

aligned_boxes[i, 0] = aligned_tl[0]
aligned_boxes[i, 1] = aligned_tl[1]
aligned_boxes[i, 2] = w
aligned_boxes[i, 3] = h

return aligned_boxes.astype(np.int32)

具体效果如下:

image-20200327180100020

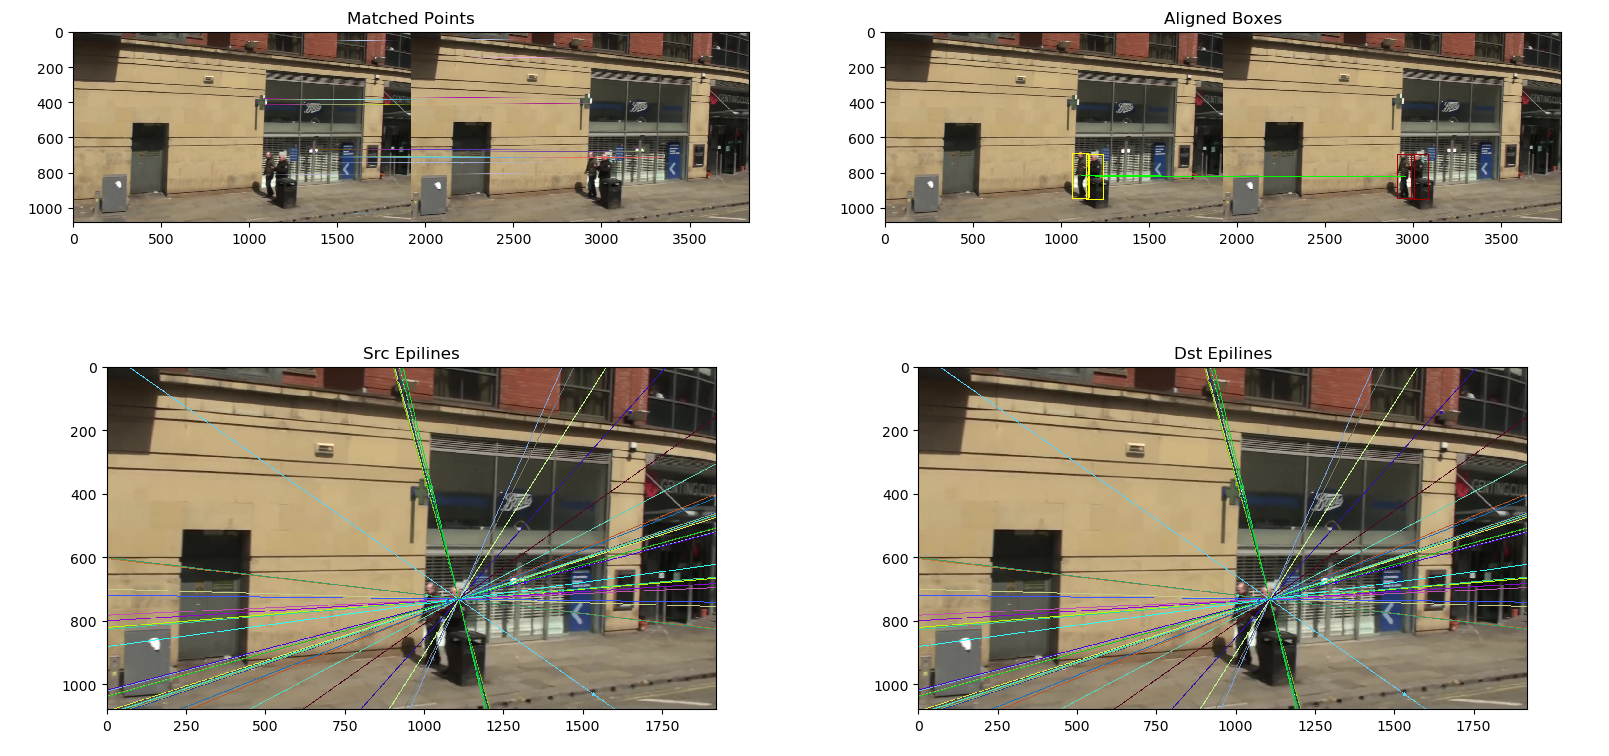
上面极线的法线也正好是车载相机的方向所在,可以看到第一章的示例问题被很大缓解了:

image-20200327180141990

3ECC

3.1原理介绍

第二章所介绍的对极几何方法,由于我们只是根据二维信息对三维信息的估计,所以也会存在误差。这一张我们也讲一个简单有效的方案,那就是“仿射变换”。当然,并不是我们所理解的那种仿射变换,具体细节我将慢慢介绍。

第一次看到ECC算法,我是在ICCV2019的Tracktor++[3]中,不过作者只是一笔带过,没有提及如何实现。ECC算法全名是增强相关系数算法[2],来自于PAMI2008的一篇论文,这个算法适用于图像配准任务的:

image-20200327180718283

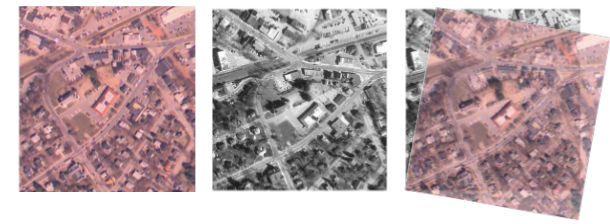
也就是对于两张内容差异小,但是存在光照、尺度、颜色、平移等变换影响的图像,将二者对齐。ECC算法本质是一个目标函数:

$$ ECC = {\left\| {\frac{{{x_i}}}{{\left\| {{x_i}} \right\|}} - \frac{{{y_i}}}{{\left\| {{y_i}} \right\|}}} \right\|^2},y = warp(x) $$
当然这只是一个原始形式,在求解过程中有所调整,我就不细讲这里的理论了。可以注意到的是y=warp(x)这个函数,所以这个算法假设两帧图像之间存在某种变换,不一定是仿射变换,可能有以下几种:
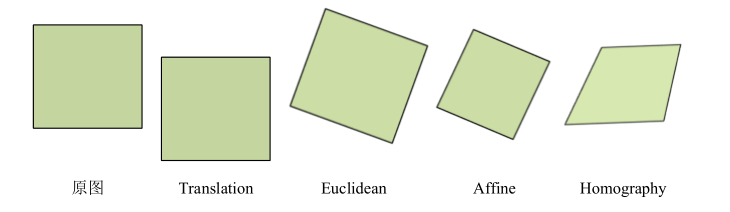
image-20200327181213719

其中最后一种透视变换的矩阵形式是:

$$ \left[ {\begin{array}{*{20}{c}} {x'}\\ {y'}\\ {z'} \end{array}} \right] = \left[ {\begin{array}{*{20}{c}} {{a_{11}}}&{{a_{12}}}&{{t_x}}\\ {{a_{21}}}&{{a_{22}}}&{{t_y}}\\ {{a_{23}}}&{{a_{24}}}&{{t_z}} \end{array}} \right]\left[ {\begin{array}{*{20}{c}} x\\ y\\ z \end{array}} \right] $$
前三种变换则不考虑最后一行信息,即2x3的矩阵形式。

3.2实验分析

opencv中正好提供了ECC相关的功能函数,这里我们只需要再次封装,以方便多目标跟踪。可以知道的是ECC算法的核心在于变换矩阵的求解:

1
2
3
4
5
6
7
8
9
10
11
12
13
14
15
16
17
18
19
20
21
22
23
24
25
26
27
28
29
30
31
32
33
34
35
36
37
38
39
40
41
42
43
44
45
46
47
48
49
50
51
52
53
54
55
56
57
58
59
60
61
62
63
64
65
66
67
68
69
70
71
72
73
74
75
76
77
78
79
80
81
82
83
84
85
86
87
88
89
def ECC(src, dst, warp_mode = cv2.MOTION_EUCLIDEAN, eps = 1e-5,
max_iter = 100, scale = None, align = False):
"""Compute the warp matrix from src to dst.

Parameters
----------
src : ndarray
An NxM matrix of source img(BGR or Gray), it must be the same format as dst.
dst : ndarray
An NxM matrix of target img(BGR or Gray).
warp_mode: flags of opencv
translation: cv2.MOTION_TRANSLATION
rotated and shifted: cv2.MOTION_EUCLIDEAN
affine(shift,rotated,shear): cv2.MOTION_AFFINE
homography(3d): cv2.MOTION_HOMOGRAPHY
eps: float
the threshold of the increment in the correlation coefficient between two iterations
max_iter: int
the number of iterations.
scale: float or [int, int]
scale_ratio: float
scale_size: [W, H]
align: bool
whether to warp affine or perspective transforms to the source image

Returns
-------
warp matrix : ndarray
Returns the warp matrix from src to dst.
if motion model is homography, the warp matrix will be 3x3, otherwise 2x3
src_aligned: ndarray
aligned source image of gray
"""
assert src.shape == dst.shape, "the source image must be the same format to the target image!"

# BGR2GRAY
if src.ndim == 3:
# Convert images to grayscale
src = cv2.cvtColor(src, cv2.COLOR_BGR2GRAY)
dst = cv2.cvtColor(dst, cv2.COLOR_BGR2GRAY)

# make the imgs smaller to speed up
if scale is not None:
if isinstance(scale, float) or isinstance(scale, int):
if scale != 1:
src_r = cv2.resize(src, (0, 0), fx = scale, fy = scale,interpolation = cv2.INTER_LINEAR)
dst_r = cv2.resize(dst, (0, 0), fx = scale, fy = scale,interpolation = cv2.INTER_LINEAR)
scale = [scale, scale]
else:
src_r, dst_r = src, dst
scale = None
else:
if scale[0] != src.shape[1] and scale[1] != src.shape[0]:
src_r = cv2.resize(src, (scale[0], scale[1]), interpolation = cv2.INTER_LINEAR)
dst_r = cv2.resize(dst, (scale[0], scale[1]), interpolation=cv2.INTER_LINEAR)
scale = [scale[0] / src.shape[1], scale[1] / src.shape[0]]
else:
src_r, dst_r = src, dst
scale = None
else:
src_r, dst_r = src, dst

# Define 2x3 or 3x3 matrices and initialize the matrix to identity
if warp_mode == cv2.MOTION_HOMOGRAPHY :
warp_matrix = np.eye(3, 3, dtype=np.float32)
else :
warp_matrix = np.eye(2, 3, dtype=np.float32)

# Define termination criteria
criteria = (cv2.TERM_CRITERIA_EPS | cv2.TERM_CRITERIA_COUNT, max_iter, eps)

# Run the ECC algorithm. The results are stored in warp_matrix.
(cc, warp_matrix) = cv2.findTransformECC (src_r, dst_r, warp_matrix, warp_mode, criteria, None, 1)

if scale is not None:
warp_matrix[0, 2] = warp_matrix[0, 2] / scale[0]
warp_matrix[1, 2] = warp_matrix[1, 2] / scale[1]

if align:
sz = src.shape
if warp_mode == cv2.MOTION_HOMOGRAPHY:
# Use warpPerspective for Homography
src_aligned = cv2.warpPerspective(src, warp_matrix, (sz[1],sz[0]), flags=cv2.INTER_LINEAR)
else :
# Use warpAffine for Translation, Euclidean and Affine
src_aligned = cv2.warpAffine(src, warp_matrix, (sz[1],sz[0]), flags=cv2.INTER_LINEAR)
return warp_matrix, src_aligned
else:
return warp_matrix, None

这里面我添加了一个技巧,由于ECC算法针对的是两幅图,所以图像的尺寸对于算法求解速度的影响很大。因此这里我根据变换矩阵的形式,设计了一种可以根据尺度放缩自动调节的简易算法。效果如下:

image-20200327182407942

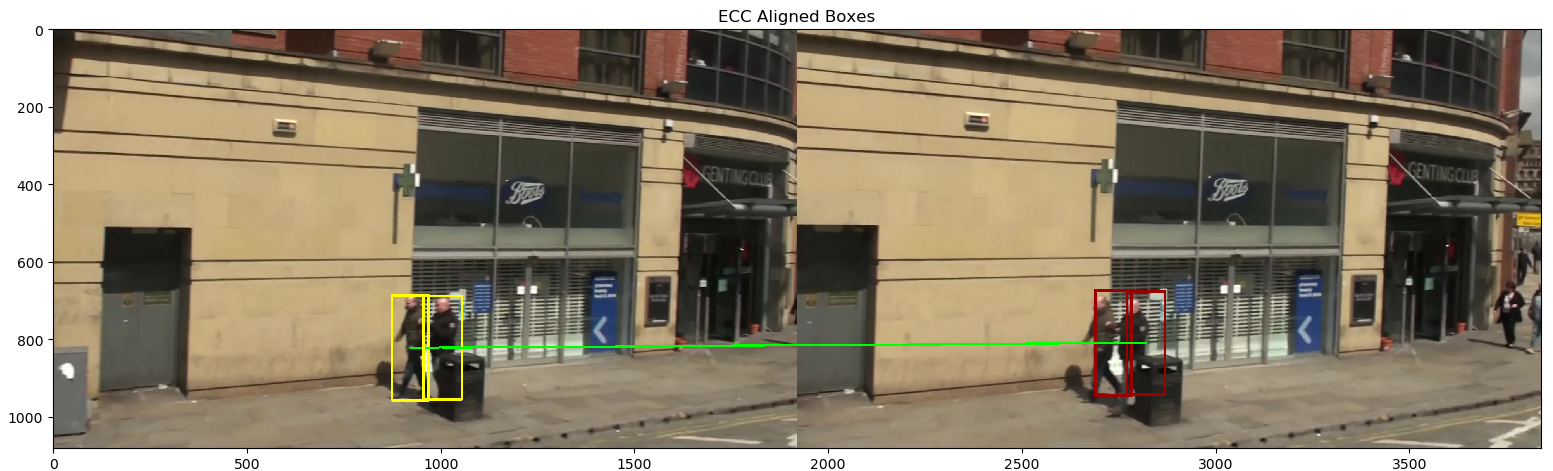
效果也很好,值得一提的是,ECC算法只需要大约几毫秒的时间,但是由于它的求解效率跟变换的难度相关,所以间隔越久越慢,而对极几何的方法效率比较稳定,不过就很慢了。

4 其他近似方案

4.1光流

上面我介绍的都是近两年关于相机运动的针对性解决方案,那么实际上在有一些算法模型中,如果场景变化不剧烈,并不特别需要用到运动模型。比如基于光流法的多目标跟踪算法,这里众所周知的就是ICCV2015的NOMT[5]算法。

image-20200327183710335

作者用的是一种简化版的快速光流法,那么更形象的可以看今年刚出的一篇论文《Multiple Object Tracking by Flowing and Fusing》,具体我就不说了,就是简单的在Tracktor++框架上加了一个光流预测分支:

image-20200327183820956

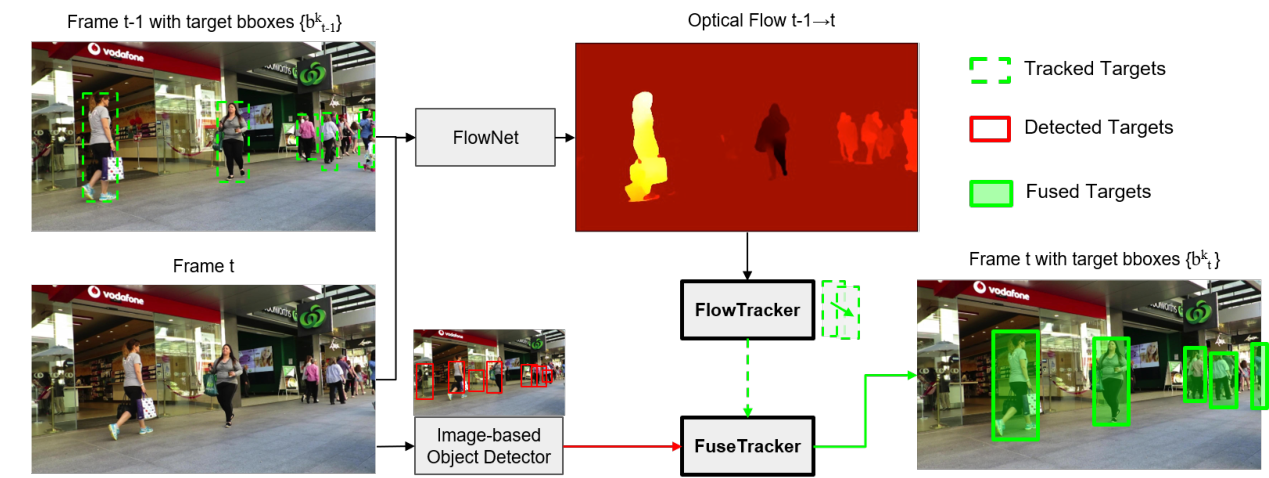
可以看到的是,光流也是在捕捉相邻帧中相似的像素信息,这一点跟第二章中提出的两种相机运动模型有点类似,所以不需要显式使用相机运动模型。

4.2SOT

而基于SOT的方法,无论是使用传统的相关滤波算法还是使用Siamese类深度学习框架,都会在上一帧目标周围1.5~2.5倍区域搜索下一帧的目标,这里面会显式或者隐式用到特征的比对。只不过不同于上面的像素比对,这里是更加高层的特征比对。

image-20200327184521981


参考资料

[1] Wang G, Wang Y, Zhang H, et al. Exploit the connectivity: Multi-object tracking with trackletnet[C]. in: Proceedings of the 27th ACM International Conference on Multimedia. 2019. 482-490.

[2] Evangelidis G D, Psarakis E Z. Parametric image alignment using enhanced correlation coefficient maximization[J]. IEEE transactions on pattern analysis and machine intelligence, 2008, 30(10): 1858-1865.

[3] Bergmann P, Meinhardt T, Leal-Taixe L. Tracking without bells and whistles[C]. in: Proceedings of the IEEE International Conference on Computer Vision. 2019. 941-951.

[4] Choi W. Near-online multi-target tracking with aggregated local flow descriptor[C]. in: Proceedings of the IEEE international conference on computer vision. 2015. 3029-3037.

[5] Feng W, Hu Z, Wu W, et al. Multi-object tracking with multiple cues and switcher-aware classification[J]. arXiv preprint arXiv:1901.06129, 2019.

[6] https://blog.csdn.net/ssw_1990/article/details/53355572

-------------本文结束感谢您的阅读-------------
坚持原创技术分享,您的支持将鼓励我继续创作!